Scraphappy Day January 2024
Posted by tialys in Arts and Crafts on January 15, 2024
For the first Scraphappy Day of 2024 it’s over to Mr. Tialys for using scraps to make something new and useful.
For his sister and her partner’s Christmas gift he had made jars of chutney, pickled onions, raspberry jam and also some cordial he made from rosehips, as you do. Instead of a basket or box like the usual hamper he decided to also make a special container.

It so happens that they have just finished having a mammoth, oak framed extension put on to their house as well as having a lot of groundwork done. There were many pallets and crates destined for the tip but Mr. Tialys can’t resist a pallet or six and they found their way to our house awaiting inspiration.
My sister-in-law is a keen gardener so he thought it would be a good idea to use the wood to make a trug for carting things around in the garden. So he did.
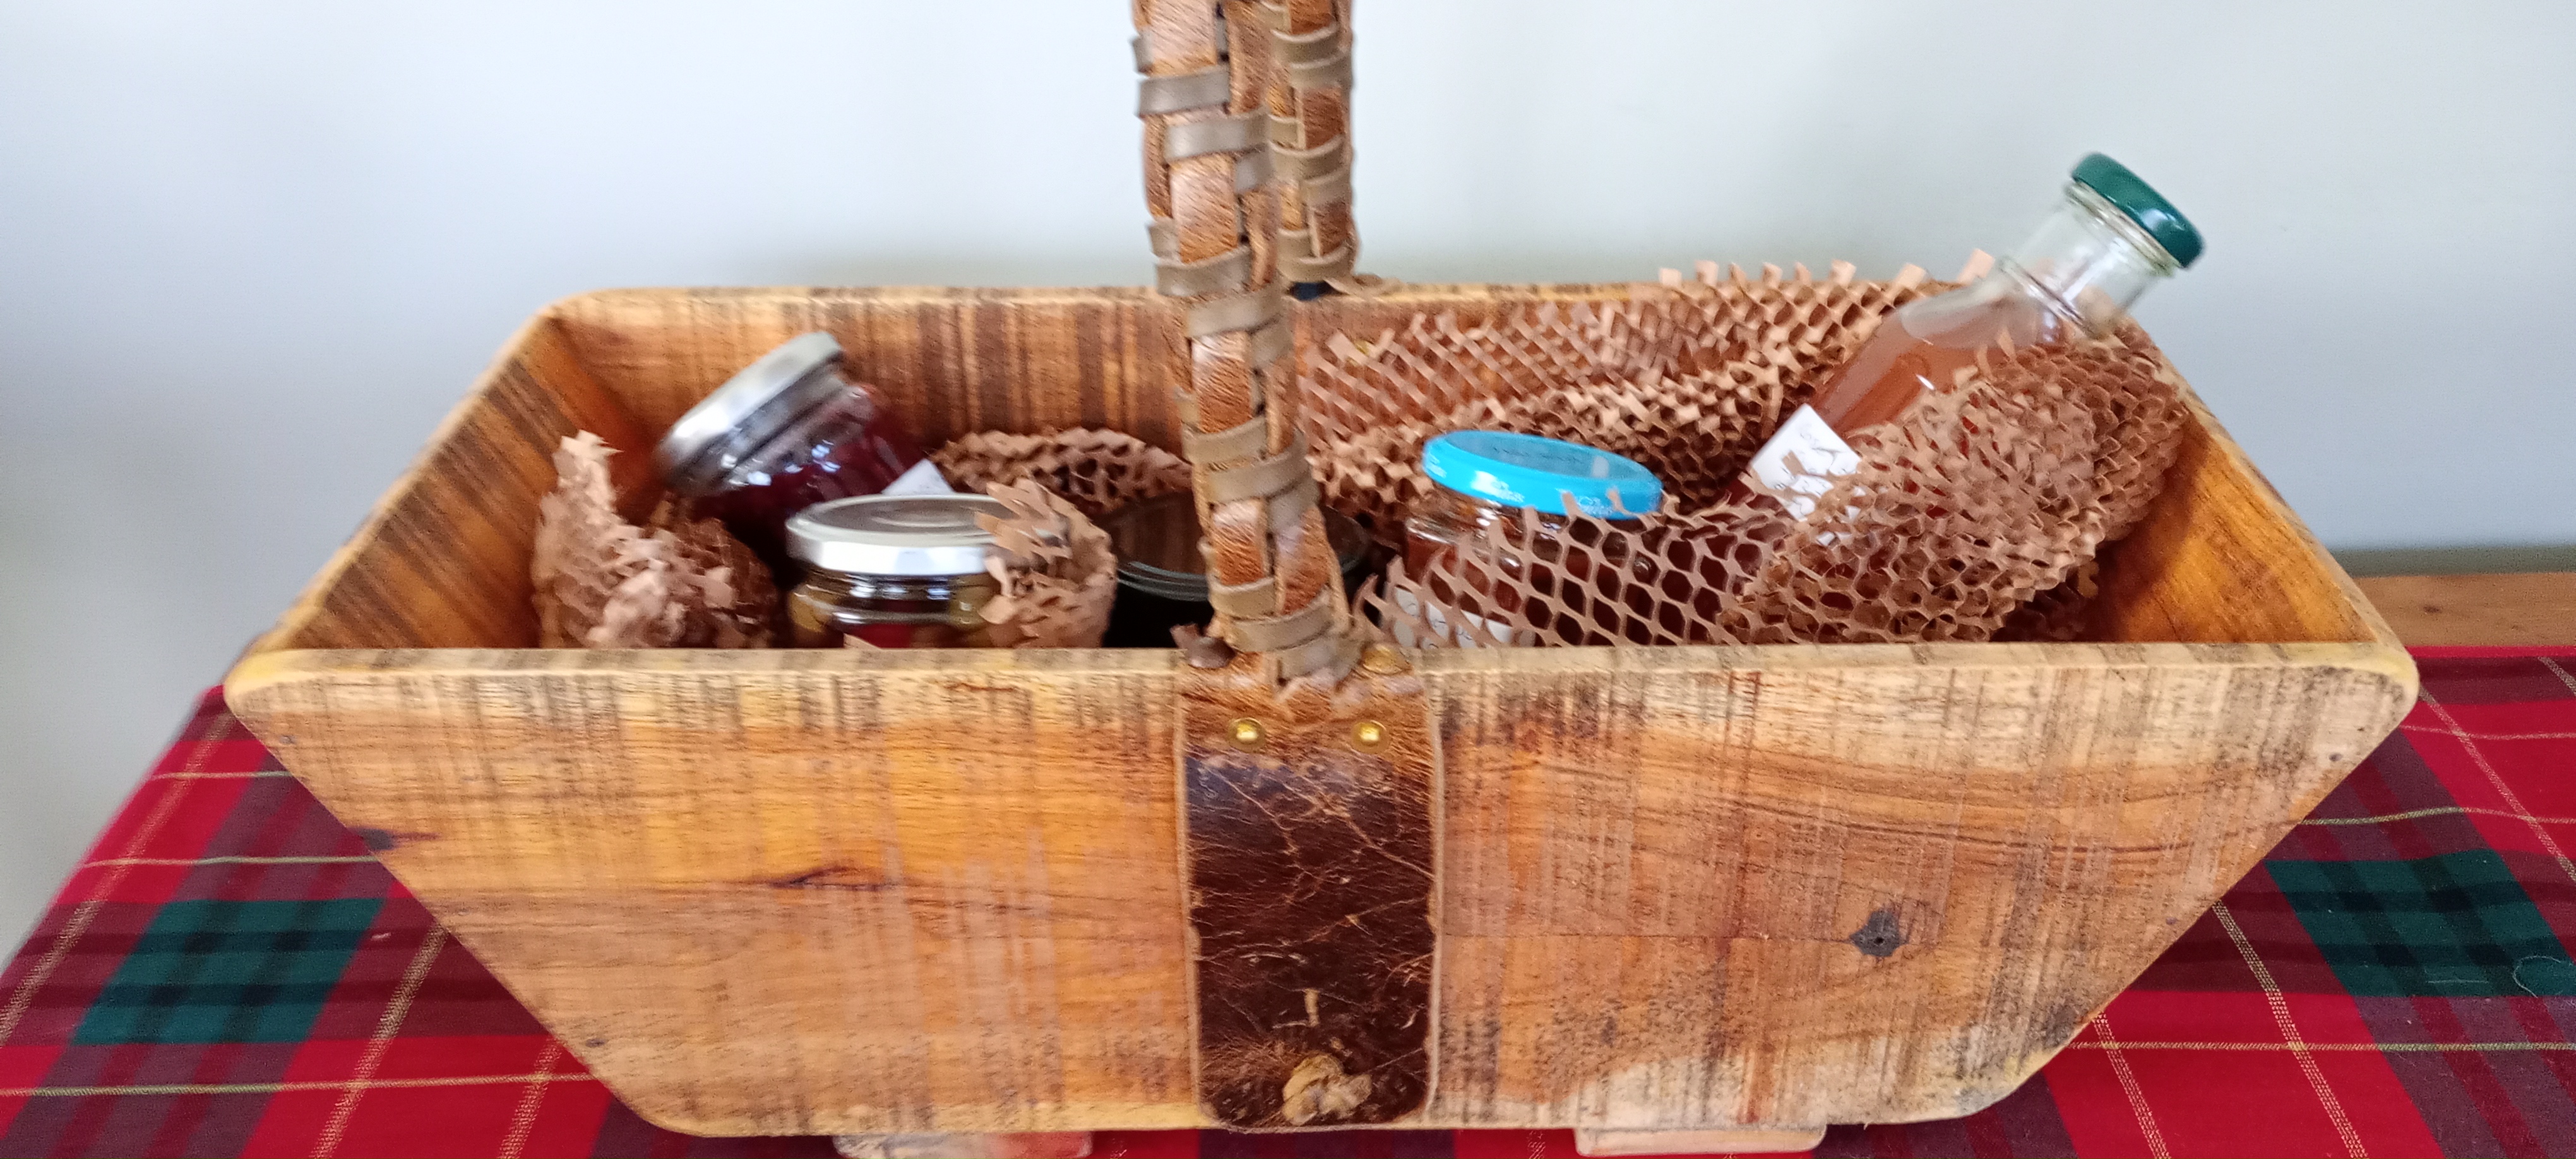
He dismantled one of the crates and rubbed the resulting planks down roughly. Then he used his mitre saw to create some joints, used a nail gun to put it together and sanded the corners to round them a little. Then a coat of danish oil and the body of the trug was done.
A piece of an old hosepipe was used to construct a handle which he then covered with braided scraps of leather and used hand peened rivets to attach it to the sides. (No, I don’t really know what hand peened means either – I’m just repeating what I’m told).

A special mention here for Cathy for telling me how to get my photos straight on to the post without going through my media library – which is full. Turns out I might finally have to move over to the block editor after all 😭
Scraphappy Day is organised by Kate & Gun for anybody who wants to make new things from scraps of any kind – doesn’t have to be fabric or yarn. Here’s a list of participants – both regular and occasional – if you want to have a look at the sort of things you can do with scraps.
Contact Kate or Gun (first names on the list) if you want to join in.
Scraphappy Day December 2023
Posted by tialys in Arts and Crafts on December 15, 2023
I have emerged from my blogging torpor to support Kate and Gun’s Scraphappy Day this month. I’ve mostly been reluctant to post as I’ve used up most of the space for photos on my free version of WordPress and, as I don’t really want a paid version, I have to trawl back more than ten years to delete old posts and photos before I can add new ones. Some of them deserve to be deleted but still, it’s a bit of a pain.
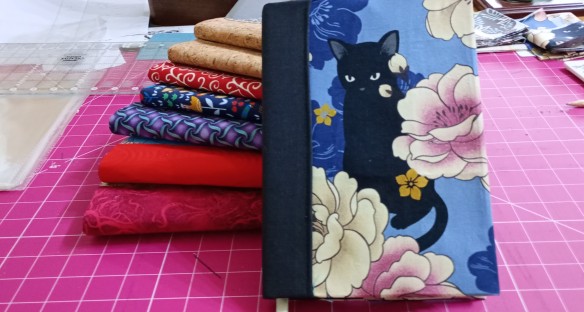
As usual I’ve stretched the rules of Scraphappy just a tiny bit and this project is more of a stash buster with scrappy elements. I have hundreds of fabric fat quarters left over from my quilting days and I’m always looking for something to do with them. I saw a pattern for notebook covers, found some reasonably priced notebooks, stocked up on some interfacing and off I went in an obsessive manner as is my wont.
Then, horror of horrors, I realised that a fat quarter wasn’t quite fat enough to make the size of cover I needed and this is where the scraps come in. I slice through the middle of the FQ, rummage through my scraps for a strip big enough to fatten the quarter to the required size and join the three pieces together. The middle section is covered by the ‘spine’ fabric (also rummaged for in the scrap bin) so it doesn’t matter whether it coordinates with the main fabric or not.

Where did I put the iron?
As I didn’t have my act together enough to do a Christmas market, they will end up in lots of Christmas stockings this year and I’ll put the rest in my online shop and I’ll have the stock ready if I do a market next year.

Some cork fabric makes a good spine
In the meantime, I must get on with making my daughter’s boyfriend a shirt from Liberty tana lawn which will be his Christmas present. I am keeping it a secret mostly because he is very fussy and won’t wear it unless it’s nigh on perfect so, if it’s not, he’ll never know I tried and failed and will get a pair of socks instead.
This one is going in daughter’s stocking.
These covers can be removed when the notebook is full and a new notebook slotted in. It’s a great PDF pattern from Diane at Spencer Ogg who makes mostly PDF bag patterns which are also excellent.
I’ve just remembered that Mr. Tialys has made an excellent item out of scraps of wood and leather and I will feature that in the January Scraphappy Day.
I’m off on Friday for the weekend for a family visit so, if I don’t respond to comments or comment on others’ projects for a while, please forgive me and if I don’t get round to doing a pre-Christmas blog (which is all about knitting so I know you’ll try to hold on to your excitement) please forgive me for that also. So, just in case, I wish you all a very happy Christmas/Holidays and a healthy, happy and peaceful New Year.
Scraphappy Day is organised by Kate & Gun for anybody who wants to make new things from scraps of any kind – doesn’t have to be fabric or yarn. Here’s a list of participants – both regular and occasional – if you want to have a look at the sort of things you can do with scraps.
Contact Kate or Gun (first names on the list) if you want to join in.
Pondlife – Scraphappy Day October 2023
Posted by tialys in Arts and Crafts, Miscellaneous Crafts on October 15, 2023
I made a felt frog using one of Cool Crafting‘s designs.

It was supposed to be a lady frog but I couldn’t get the green glass eyes and the amber ones made him look more masculine in my opinion so I decided against the suggested flower coronet and left him naked as most frogs tend to be. I know this because we had thousands of tadpoles in our pond and the froglets I’ve seen so far are as naked as the day they were spawned. However, I have it on good authority that, sometimes, a frog prince is born and he, of course, would wear a crown.

In case you’re wondering what this has to do with Scraphappy Day, I made the crown out of some lining left over from a dressmaking project. It has quite a lot of body in it so I just cut the crown shape out in two layers, sewed them right sides together and turned it out. Then I made the ‘jewels’ by practising my newly discovered (and still far from expert) French knots.
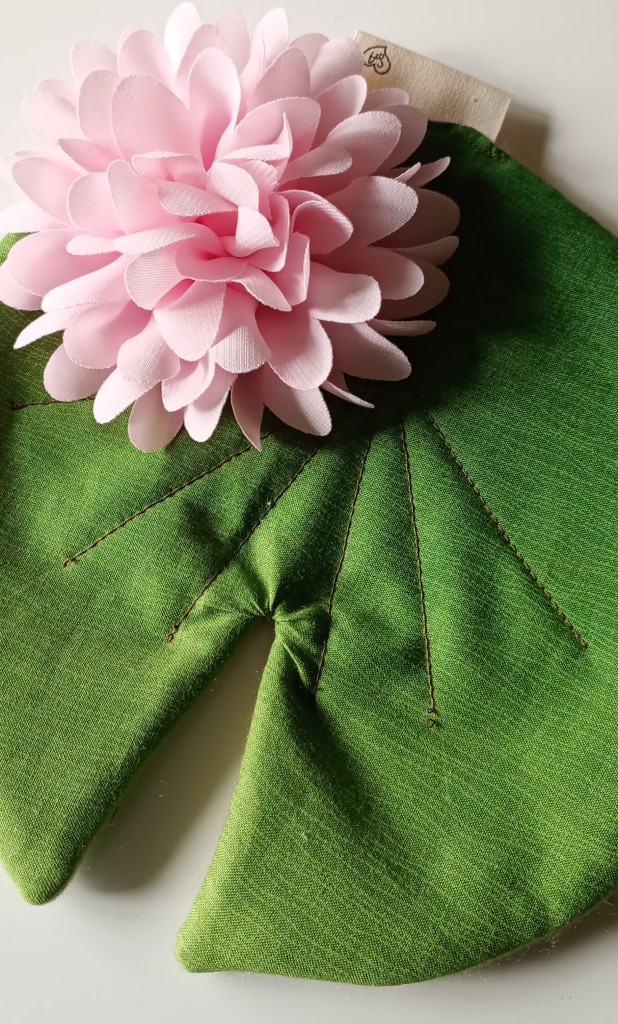
Even though I’d decided to leave him ‘in the nip’ I felt something was missing from the scenario so I made him a lily pad to sit on.
I had a green cashmere jumper that had gone bobbly beyond saving so I had previously put it in the washing machine a few times and saved the resulting felted fabric. Perfect to cut out a lily pad shape.

I backed it with some green ombré fabric from my scrap box and added a ‘something special’ label.
Finally, my friend owns a craft shop and was getting rid of some excess bits and pieces and gave me a couple of fabric flower shapes, one of which made the perfect addition to the lily pad.
So the frog, aided by a little bit of Scraphappiness, is now ready for a kiss to turn him into a real boy.

Or was that Pinocchio?
Scraphappy Day is organised by Kate & Gun for anybody who wants to make new things from scraps of any kind – doesn’t have to be fabric or yarn. Here’s a list of participants – both regular and occasional – if you want to have a look at the sort of things you can do with scraps.
Contact Kate or Gun (first names on the list) if you want to join in.
Birthe, Turid, Susan, Cathy, Tracy,
Jan, Moira, Sandra, Chris, Alys,
Claire, Jean, Dawn, Gwen,
Sunny, Kjerstin, Sue L, Vera,
Ann, Dawn 2, Carol, Preeti,
Nóilin, Viv, Karrin, Amo, Alissa,
Lynn, Tierney and Hannah
Workshop Temptation
Posted by tialys in Arts and Crafts, Mosaics on September 29, 2023
I might have mentioned that I’d become interested in a new craft and promised to let you know what has now grabbed my butterfly mind and necessitated the need for yet more shelves to be created and commandeered by me – although, this time a lot of the supplies can be kept in the garage and not the house. (I have to laugh re-reading that last bit as our garage is already almost full to bursting with ‘stuff’ that definitely doesn’t include the car.)
I do love a workshop but although basic embroidery, wicker work, Dorset buttons, metal stamping and making my own knickers out of a t-shirt were all fun once was enough and, in some cases, more than enough.
I have come to the conclusion that life is definitely too short to make my own apple catchers.

Not my knickers
However, I decided that making mosaics from broken china and found items – or picassiette to give it its formal name – would be something very different for me but, at the same time, right up my street. At least it will be if my street can now accommodate a face mask, safety glasses, protective gloves, sharp instruments and sticky, claggy substances. As I said, something very different for me.

So, as is my wont when getting interested in a new craft, I have provided myself with books, tile nippers, adhesive, grout and all the other bits and pieces involved although, sadly, I left my vast collection of vintage china in France where I used to make tiered cake display stands so have had to begin the search all over again. Charity shops are obviously my first port of call but they have usually disposed of anything cracked or chipped before they get to the shelves and I must admit to feeling bad about cutting up a perfect item. I have put the word out in the shop where I work a couple of shifts to keep anything broken for me but, so far, not much luck. Still, the hunt is all part of the fun I suppose.
As a little sewing side story – the instructor at the workshop told us to bring an apron to protect ourselves from adhesive and grout but I didn’t have one. The shame! Anyway, Amazon yielded cheap versions, some frilly, some nasty but instead I found a free pattern on the Tessuti website and rummaged in my stash for surplus fabric somebody had given me for nothing and made one myself in the time it takes to plough through the offerings online – well, not quite, but it’s certainly a quick make if you’re in need and would look great in denim or a canvas blend.


I suppose I’ll have to do some baking or something now.
My workshop instructor, Judith, has adopted the picassiette style and mostly creates mosaics for display indoors but she had made one on a slate tile which I bought from her to serve as inspiration while I get my hand in – plus it’s a hare and I’ve got a thing about hares at the moment.

My plan is to make mosaics for the outdoors, partly because we have quite a lot of lovely slate tiles scattered around the garden I can use for a substrate (see how I’m getting the lingo down already) and partly because there is no room in our house for anything else so I’ve had to start decorating the outside.
At the workshop we could choose two wooden shapes to mosaic and I chose a couple of fish thinking they’d go in my bathroom although they are far from perfect. So much so that I’m only going to show you one of them.

Room for improvement but it’s quite a forgiving craft and has certainly got me interested enough to carry on.
I now have some sort of compulsion to see every piece of china or glass as a prospective item to take some cutters or a small hammer to which can’t be healthy. Maybe I could get myself invited to a Greek wedding.
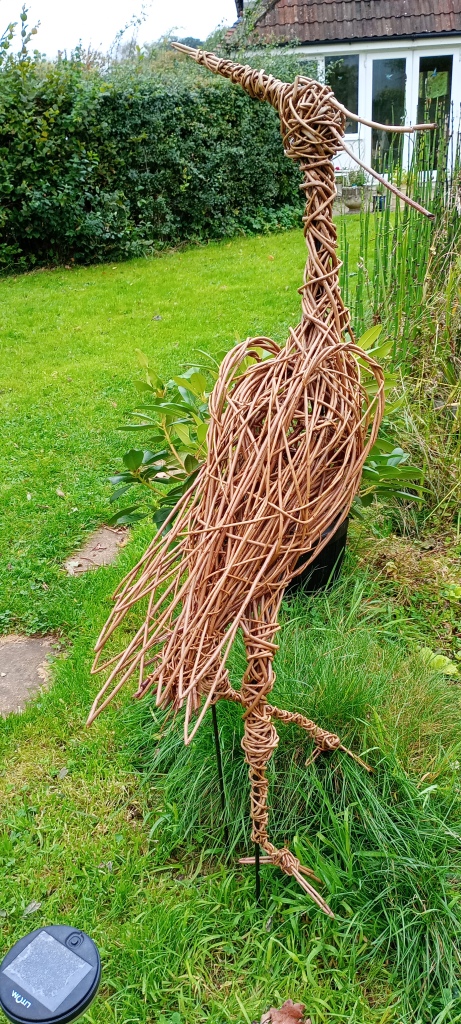
I mentioned a doomed wicker workshop earlier. I attended one whilst still living in France and didn’t do too well. I got lost on my way there, arrived an hour late and was so discombobulated that I was in a flap the whole time and made what was supposed to be a hare but could have been anything from a mouse to an elephant. Unsurprisingly, it didn’t make the move back to England. Recently I suggested to Mr. Tialys that he take a break from work and enrol himself in a wicker workshop taking place in a nearby town. He made a heron which, of course, looks as exactly like a heron as can be expected by twisting bits of willow together and now has pride of place by the pond exercising a reign of terror over the fish.
I’ll try to keep you up to date on my progress with mosaics, hopefully there’ll be some worth mentioning.
Monday Moos
Posted by tialys in Garden and Wild Life, Life in General on September 18, 2023
We are in the midst of a dairy cow and sheep farming community and are used to the cows grazing in the field behind us, so close sometimes it seems they are almost in the house with us.

However, one of the farmers has diversified and runs some luxury lodges for people wanting to spend a bit of time in the countryside and enjoy watching the livestock as they relax in the hot tub (the guests that is, not the livestock).
He thought he’d get some of these beauties in to add to the other beasties – we are also in horse racing stables country – and I walked the dogs up the road to have a closer look today,

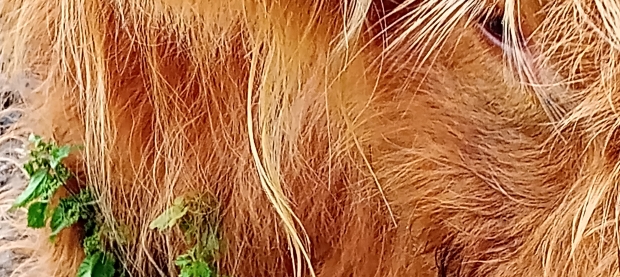
There’s something about Highland cattle that make them so endearing.

Aren’t they handsome?
He did talk about getting some zebras but he may have been joking about that – although I think llamas might be on the cards.
A Literary (Sewing) Diversion
Posted by tialys in Arts and Crafts, Miscellaneous Crafts on September 8, 2023
As you may remember from my last post where we were dressed in (vaguely) 1920s garb, we recently celebrated our daughter’s 30th birthday.
Thanks, I like to think, because of our endless buying of books, reading together when she was little and, later, our own reading habits and recommendations, she is an avid reader and, although she has a predilection for fantasy literature she is also a big Jane Austen fan.
So, when Cool Crafting came up with a special Jane Austen kit as part of their literary series, I pre-ordered it and, whilst waiting for it to be delivered, I made two mice for which I already had the pattern and hoped I’d get it all done in time for the big day.

The clothing designs Cool Crafting produce for their various animal patterns mean that you create rather good copies of full size garments and, even though I’m a fairly proficient dressmaker, I still found plenty to challenge me with the process and the fabrics provided. Straw patterned pleather anyone?
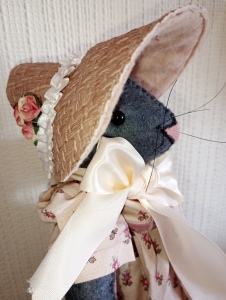
The outfits were really designed for Cool Crafting’s famous Luna Lapin which is a rabbit so the bonnet has space for rabbit ears but my mice only have mouse sized ears so I should have closed the hole up really but didn’t want to chance messing with the pattern as there was only so much special pleather available.

Anyway, one of the biggest challenges for me (apart from the pleather bonnet) was doing the French knots used in place of buttons on the breeches and waistcoat for Mr. Mouse as I am no embroiderer and had to follow a video tutorial on YouTube in order to achieve anything vaguely like a French knot.

I feel the empire line dress also deserves a little photo of its own before being covered with the short jacket that completes the outfit.

(completed also by the era appropriate undies)

I’m not sure about the French knickers being era appropriate but I put them on her anyway – she is a modest mouse.
At the moment, our daughter is living in a house share but has plans to move into a much larger space soon so I put the pair on stands, in a pretty covered box and said I understood if she keeps them like that until she has the room to display them.
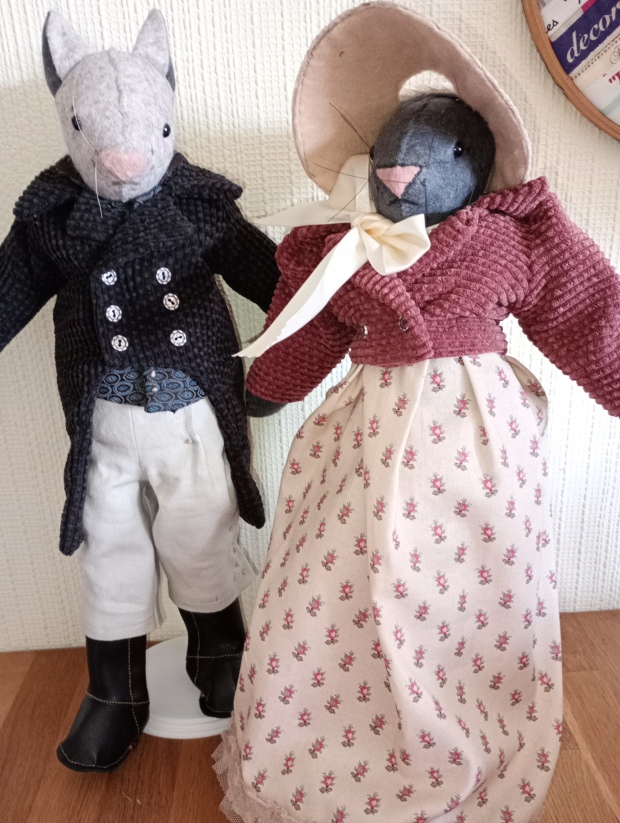
The Happy Couple
Back to human sized clothes soon – in fact I already have some trousers to show you, it’s just getting round to doing the post.
We’re going to a craft fair this weekend where I’m hoping to buy an example of my most recent obsession, craft-wise, from the lady who taught the workshop I went to last weekend. News of which, hopefully, will be in a future post. Have a good weekend whatever you’re doing.
A Celebration and an Excuse to Dress Up
Posted by tialys in Life in General on August 18, 2023
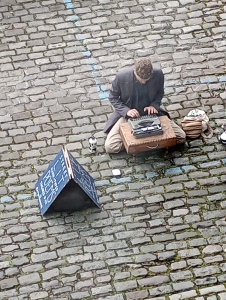
I went to Bristol at the weekend, a very lively and buzzy city which also happened to be hosting the annual Bristol Balloon Fiesta so it was even livelier and buzzier than usual. However if you are interested you can see better photos than I could take if you follow the link. Instead, I took a photo (from the upper window of a museum) of this guy who set himself up with a manual typewriter and a chalkboard sign offering to type a poem for you after asking a few questions about your life. The man standing next to me said it reminded him of a similar thing he’d once experienced in India where people would pay somebody to write letters for them if they were unable to do so themselves. My attempts at poetry are rubbish (and therefore non-existent) but I didn’t indulge. Just found it fascinating. Would you have asked him to type a poem for you?
Anyway, I didn’t go to Bristol for the balloon fiesta. Our daughter turned 30 last weekend and she threw a party with a 1920s theme. The venue was in an old building with a 1920s décor so was the perfect choice. She invited us, her parents, or did I invite us I can’t quite remember. Unfortunately, we couldn’t find a dog sitter for an overnight stay so Mr Tialys had to stay behind and I went with my sister-in-law who is the favourite aunty.
All the ‘youngsters’ wore very similar flapper dresses which looked great but, as mother of the birthday girl, I opted for a less glitzy (and less revealing) one – it still had sequins and beads but in the same colour as the dress – and my SIL had a long elegant dress with long black gloves, long cigarette holder and headband.
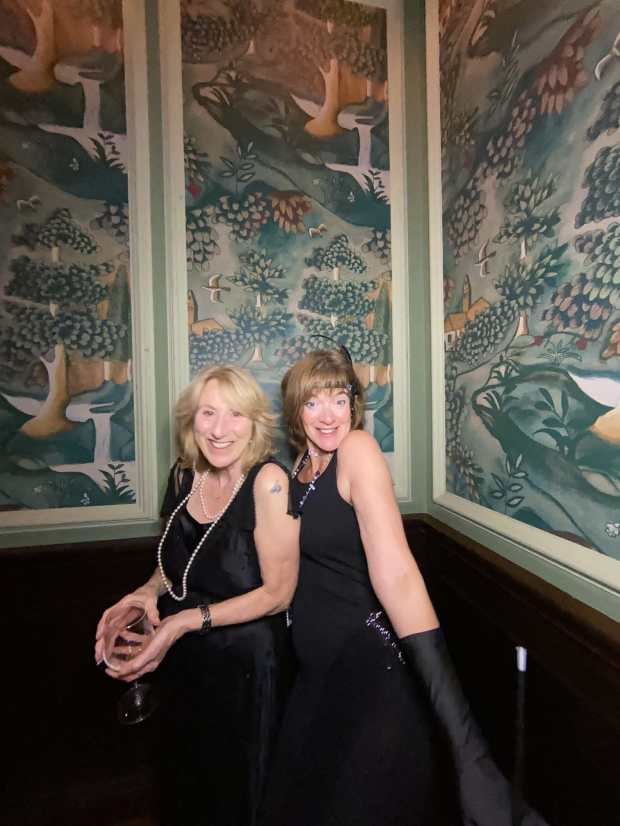
Me & the SIL
I hate having my photo taken and am totally useless at selfies so I surprised my daughter by making full use of the ‘photo booth’ she’d installed in a corner where you could go and pose as seriously or madly as you wished, sometimes aided by props. The more alcohol ingested the sillier the photos became – not that I over indulged as I find I am unable to cope with even the slightest hangover these days.
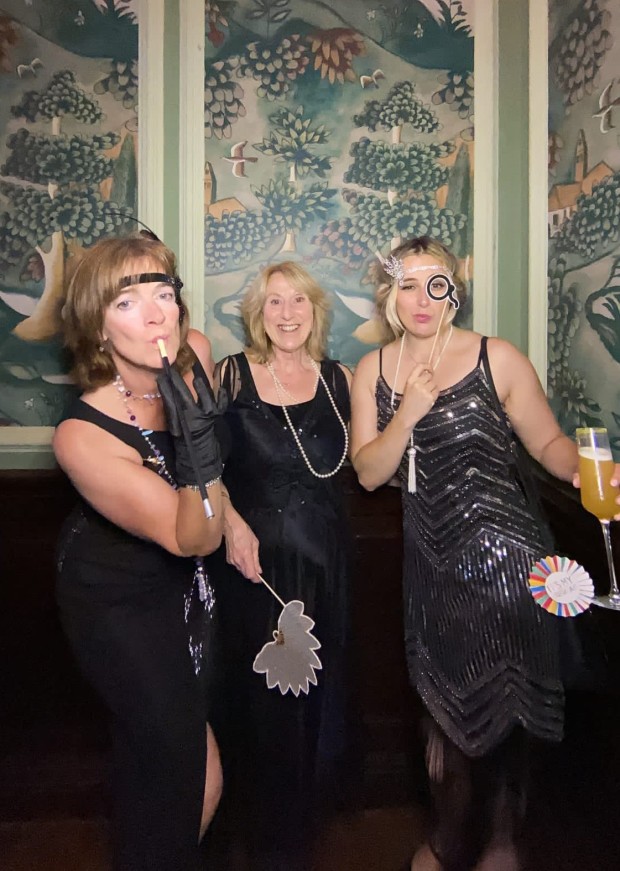
With the Birthday Girl
She got her boyfriend to fix it so that nobody (by which she mainly meant me) was able to fiddle with the results from the camera in order to delete anything they didn’t like.

He’s ‘in the business of IT’ so produced a really good video of a collection of photos with a 1920s style soundtrack which is a lot of fun and will make a nice record of her party to look back on. You can hire more complicated set ups but this one was literally an iPad mounted on a tripod with a ring light installed above it and whatever he had done to make it do the photo booth thing. 
They had a more sophisticated setting at the wedding reception we attended recently but I didn’t know any of the other guests so didn’t use it. I would recommend it though, if you have a special event coming up, as it was certainly something that was well used, people had fun and I think the results were quite good.
I wanted to put some of the photos in a post so I know where to find them when I want to reminisce rather than plough through my really badly organised photo folders on my laptop.
Have you been to an event where they had a similar photo booth thingy going on? Did you use it or were you too shy? Would you consider having one at a future celebration? Not that I’m in the business of hiring out the equipment or anything – just interested.
An English Summer Party Dress
Posted by tialys in Arts and Crafts, Dressmaking Projects on August 8, 2023
We were invited to a wedding reception and I decided to make myself a dress to wear which would be suitable for a July evening by the quayside on the South coast,
After my recent spate of more challenging makes I decided on this pattern from Closet Core (formerly Closet Case) as I’ve used their patterns before and find them really good.
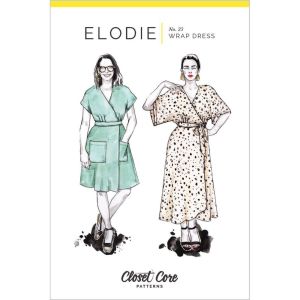
I know wrap dresses can sometimes be a pain, gaping at the bust and revealing too much leg but the reviews stressed that this pattern gives you a good overlap so I decided to go for the midi version (which is almost maxi on me- I’m 5’3″) .
I didn’t want to go floral as I have quite a few flowery dresses nor did I fancy geometric so I went for this ‘safari’ fabric which is a bit different and, from a distance, just gives an overall patterned effect on a subtle, vaguely pink background. It’s a linen/rayon blend so has a very good drape which I think you would need for this pattern.
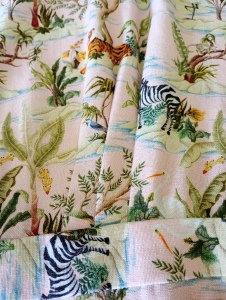
Here you can see the fabric close up and also the ‘bust release’ gathers which really help with the comfortable wrapover.
This was a very enjoyable, fairly stress free make apart from the cutting out part. For the midi version with longer kimono type sleeves I think it took somewhere between 3.5 and 4m and the pattern had to be cut on a single layer of fabric which was unusual and a bit of a challenge finding the space to spread it all out. After that though all was plain sailing.
I added some satin bias binding on the facing inside the bodice.
Here is a headless shot so you can see the actual dress features…

…..and here a demonstration of the generous overlap of the wrap so you don’t have to worry about revealing anything untoward if the wind gets up

Just as well as the wind did indeed ‘get up’ accompanied by rain bucketing down and, as the venue was literally just across from the marina, it bucketed horizontally too. I told you it was an English Summer dress. Luckily we had booked a hotel just a few minutes walk away from the venue which was, thankfully, indoors and not in a marquee which will always be a gamble in England I have to say.
Still, I really like this dress and would like to make it again – my only regret is that I didn’t put pockets in the side seams. I thought about it and, surely this is a dress that cries out for side pockets (I don’t like the patch ones on the pattern illustration) but thought there might be some reason in the construction for why they hadn’t been added but, now I’ve made it, I don’t think there is so, if I do make it again, there will definitely be pockets.

This Saturday is my daughter’s 30th birthday and she’s having a 1920s themed party. I toyed with the idea of making a dress but thought about beaded and sequinned fabric and the trauma and dramas which sewing with it would inevitably involve and bought a ‘pre-loved’ one instead.
There are limits.
Challenging Myself No. 3 – A Topsy Turvy Tale of Pin Tucks
Posted by tialys in Arts and Crafts, Dressmaking Projects on July 27, 2023
As I put the finishing touches to my Quinn Trousers (pattern by Merchant & Mills) mentioned in a recent post, I realised I have shown you Challenge no. 1 (waxed cotton anorak) and Challenge no. 2 (tailored jacket) but forgot about No. 3 which was a pin tuck blouse. This forgetfulness may have been partly down to the imperfections and mistakes I made with it but, as I don’t like to spare you any gory details I should really blog about it before I move on to Challenge no. 4.

I saw the Byrdie button up pin tuck blouse/dress by Pattern Scout initially on Love Lucie’s blog and, should you be thinking of making this, Lucie does a very good job of talking you through the process whereas I, as usual, have left it so long to post about that I only remember the bad bits which, I must emphasise, are all down to me and not the pattern. Anyway, I thought it looked good and would make a suitable challenge for me as pin tucks are something I’ve never really tackled before.
So, I bought some very similar linen blend fabric to the one that Lucie had used – because it’s not possible to have too many white shirts or blouses is it? -and got to work on version B which has ‘tuxedo shirt-style tucks across the bust, bishop-style sleeves, and a simple band collar’.
The first disaster was my bobbin thread was looping and I didn’t notice it until several of the tucks had been sewn. “It will be on the side of the tuck that’s pressed downwards” I assured myself, fixed the problem (can’t remember what it was now but it was bound to have been the sewing machine’s fault) and carried on. Suffice it to say there is the option to put a pin tuck or a pleat at the back below the collar. You will not need me to tell you which option I went for but I took a photo so I’ll show you anyway.

OK, I’ll tell you as well – It’s a pleat.
The second disaster was that, as I admired the neat pin tucks I’d created, I realised I’d put them on the wrong side of the bodice pieces, the fabric not having a right and wrong side. I had a minor hissy fit – well, O.K., I went all dramatic about it – thinking how awful it would be to undo all those neat little tucks. I even tried to convince myself that the reverse side of the tucks would look good as a feature on the front of the shirt although what that inversion would have felt like next to the skin I can’t imagine.
When I calmed down I realised that, if I switched the bodice pieces round and put the buttons where the buttonholes should be – and vice versa – I would have a blouse that buttoned up the ‘male’ way but at least the pin tucks (imperfect as they are) would be on the front as Pattern Scout intended.
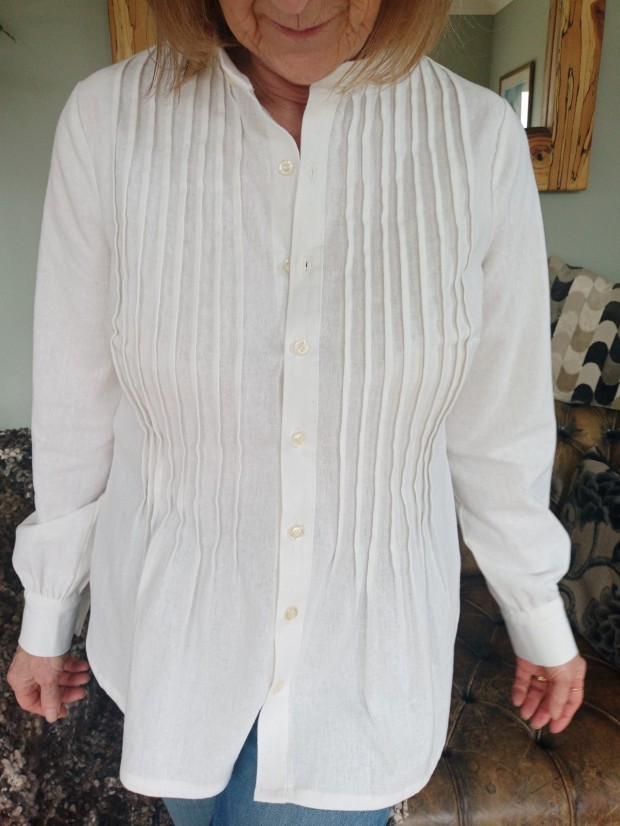
The third disaster is that I’ve yet to wear it and not sure I ever will. The fabric feels fairly stiff and formal and I’m not sure that an already generous bust is enhanced by having pleats all over it.
However, it is definitely wearable and, when the cooler weather comes round, I might wear it open over a t-shirt or style it somehow so that it looks OK.

So, pin tucks…. Been there, done that and never going to do it again.
Now to finish those challenging trousers and write about them while I can still remember where I put the photos and what was good and bad about the process and, of course, as I’m involved there will definitely be some bad (Spoiler Alert – buttonholes).
Talking of spoilers, I’m not going to give away anything but, talking here mostly to the U.K readers, what about that winning garment on last night’s Great British Sewing Bee final? Absolutely amazing, ingenious and beautiful and all within a time limit. It takes me that long sometimes to put a zip in.
Eleventh Hour Scraphappy Day- July 2023
Posted by tialys in Arts and Crafts on July 15, 2023
Having told Kate (one of the organisers of Scraphappy) that I wouldn’t be participating this month because I don’t seem to be making anything lately that produces the sort of scraps I like to use to make new things with, if you get my drift, I got a hold of myself, remembered that I used to be a more organised person (well, ish) and have a parts department with cotton fabric cut into squares and triangles and sometimes even circles. (A possible entry there for the longest sentence of the month).
Anyway, I am waiting for the arrival of buttons so that I can get on with my Merchant & Mills Quinn Trousers I told you about in my last post. Why is it, I wonder, that I have jars, tins, boxes and cards of buttons yet never have a) the right colour b) the right style or c) the right size or if I have any of those three, never in the right quantity. It makes me want to get rid of all those buttons – think of the space I’d have – to the excess button recycling centre which every town and village must certainly have and just buy the ones I want when I want them.

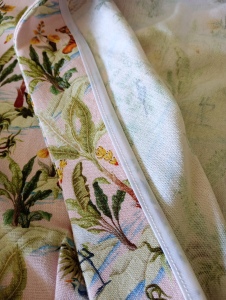
Eventual positions of elusive buttons. Always nice to slip some Liberty lining into a project even though nobody will know it’s there but you.
So, two years ago, in the midst of the pandemic, I did a Scraphappy post where I’d made some reusable cleansing pads made out of a ‘pre-loved’ flannel baby sheet and some of the squares from my parts department. They have been in use every day since so I thought it might be time to make some more.

This time I used a ‘pre-loved’ hand towel for the backing because I thought towelling would work better when I use my facial soap, whereas the flannel fabric seems to work better with cleansing milk or micellar water.

So easy to make and so quick. Just cut pairs of squares in whatever size you fancy, one out of flannel or terry towelling, and one of fabric. With right sides facing, sew around the edge leaving an inch or so open for turning. Trim the corners then turn right side out. Stitch around the square close to the edge so that you catch the opening and, there you go.

Some might say ‘why don’t you just use a face cloth and be done’ but that wouldn’t be any fun would it? (Plus. you wouldn’t have an entry for Scraphappy Day.)
Also I make nice little lined waterproof pouches to put them in so you can keep the clean pads in the outer pocket and zip the used ones up inside, then pop the whole lot in the washing machine.

My daughter took the one I made her on her New Zealand trip and it was universally admired and coveted.
Well, that’s sort of what she said.
Scraphappy Day is organised by Kate & Gun for anybody who wants to make new things from scraps of any kind – doesn’t have to be fabric or yarn. Here’s a list of participants – both regular and occasional – if you want to have a look at the sort of things you can do with scraps.
Contact Kate or Gun (first names on the list) if you want to join in.
Kate, Gun, Eva, Sue, Lynda,
Birthe, Turid, Susan, Cathy, Tracy,
Jan, Moira, Sandra, Chris, Alys,
Claire, Jean, Jon, Dawn, Gwen,
Sunny, Kjerstin, Sue L, Vera, Edith
Ann, Dawn 2, Carol, Preeti,
Debbierose, Nóilin, Viv, Karrin,
Amo, Alissa, Lynn (me), Tierney and Hannah


My Vintage Shop

My Handmade Shop